Today I’m sharing a much requested tutorial for the corner to corner knit blanket rectangle. I adapted this free knitting pattern for corner to corner blanket pdf to convert a square to a rectangle and this opens so many more possibilities!
If you have never knit before, start here: Learn To Knit for Beginners
What you will need:
You will need a Size 17 US or 12.5mm Circular needle at least 29-inch long for this blanket. Even though it is a circular needle, you need to knit back and forth, and not in the round. The circular needle is simply to accommodate a large number of stitches.
I used 4 colors of yarn for my blanket and they are all Lion Brand Wool-Ease Thick and Quick yarns. This yarn works up very quickly and hence a great choice for quick projects. I also love the colors they come in! This is not a sponsored post, I like to build my yarn stash during sales online.

- 1 skein of Pink-Lion 640-103D Wool-Ease Thick & Quick Yarn, Blossom
- 1 skein of Yellow/Ochre Lion 640-158 Wool-Ease Thick & Quick Yarn, Mustard
- 1 skein of White- Lion Brand Yarn 641-099 Wool-Ease Thick & Quick Yarn, Fisherman
- 1 skein of Grey-Lion Brand Yarn 640-148 Wool-Ease Thick & Quick, Hometown, Quick Yarn, Slate
- Any medium (4) yarn in a dark grey color for the border
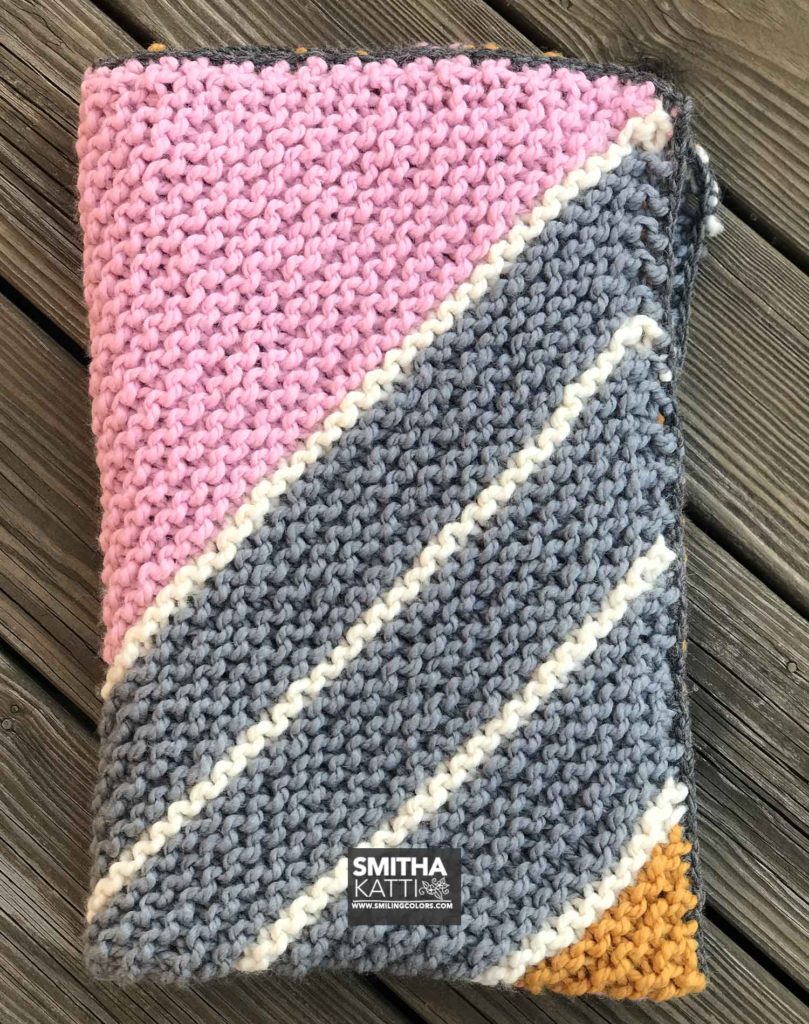
corner to corner knit blanket rectangle
Let me break this corner to corner knit blanket rectangle into three portions- the increase, the middle, and the decrease.

INCREASE: We start with the increase area, here in pink yarn. You start by casting on 1 stitch. And then you work in the following pattern:
Row 1: Knit in front and back of the first stitch, knit till the last but one stitch, knit in the front and back of the last stitch. (We’ve made or created 2 extra stitches in this row)
Next row, and all even rows: Knit all stitches.
Repeat these two rows until you have a triangle whose two sides measure 28 inches (this is the width of our blanket)

MIDDLE: Next is the middle area. This is the area I created with a grey and white stripe. In this portion, we simply grow the blanket, but as we are knitting on the bias we need to increase each row by one stitch and decrease that one stitch at the end of each row. The pattern goes as follows:
Right side: Knit in the front and back of the first stitch, knit till the last two stitches, knit 2 tog (We have maintained the number of stitches on the needle)
Next row, and all even rows: Knit all stitches.
Repeat these two rows until you measure the length to be 40 inches.

DECREASE: We end our blanket with the decrease area, here in yellow/ochre colored yarn. You work in the following pattern now,
Right side rows: Knit 2 tog, knit till the last two stitches, knit 2 tog (We’ve decreased 2 stitches in this row)
Next row, and all even rows: Knit all stitches.
Repeat these two rows until you have two stitches left on your needle. Knit 2 tog to cast off.

ALL DONE:
And here it is! I hope this corner to corner knit blanket rectangle tutorial explains it all. This blanket took me about 5 days to knit, but it can be easily finished in one long weekend. It is a small blanket, therefore perfectly portable!

I finished off the blanket with a single crochet border all around. A darker grey color medium yarn (4) with a size I hook created a bold yet simple edge. You can learn how to single crochet easily.

I absolutely loved the color pop of the thin white stripe. I kinda wish I had added the white stripe throughout the blanket instead of just in the middle area. That could be a great option if you were to recreate this!

NOTES:

- This blanket can be easily made in different colors to suit what you have in mind. A great option would be to use just grey, white and pink colors. Replace the yellow/ochre area with the pink itself for a more symmetric look. The choice is yours.
- This blanket is worked in all knit rows, just like this garter stitch blanket, but you could also change it to a stockinette stitch blanket by purling all of the even rows instead of knitting them.
- For my color changes, since I used a thin white stripe, I cut the white yarn after each use. However, I did not cut the grey yarn, but carried it up instead.
- Gauge isn’t really a main part of this blanket. You can literally pick up your needles and start knitting. Make sure to choose a needle size appropriate for your yarn type.
corner to corner knit blanket rectangle Method:
You can make your corner to corner knit blanket rectangle as large as you want easily! In other words, you can keep knitting until you are happy with the knit fabric size. Follow these three steps:
- Increase the area until you reach the width of your choice.
- Once you have reached the width, stop the increase. After that continue building the middle area until the length becomes the size you want.
- With the width and length achieved, now all you need to do is decrease. Create the final two corners of the blanket to finish it off.
corner to corner knit blanket rectangle Pdf:
DOWNLOAD HERE: Corner to corner knit blanket rectangle pdf
I enjoyed knitting this rectangle blanket so much! Check out more of my knitting patterns for blankets and throws for more such colorful patterns. Happy Knitting friends!
Thanks so much for the knit blanket! You have great patterns!
Thank you! Glad you find the patterns useful!
I love your color choices. Thanks for sharing.
Thank you so much for this post!! I’ve been trying to find out how to knit on the bias for a while now but all the patterns or tutorials are either all about garter stitch or square shape. Your photos and explanations were perfect! I can’t thank you enough.
Hello Smitha, I’m an experienced knitter, but have never knitted on the bias before. I am designing a lace bias shawl and needed some clear instructions for how to manage the increases and decreases for knitting on the bias. Your writing and instructions are so clear and understandable. Thank you!
From a novice knitter, thank you so much for this easy to follow tutorial!❤️
Glad you found the tutorial useful!
This is exactly what I needed. Thanks!
Thank you so much for your very easy to follow instructions for a very tricky thing to work out. I really appreciate it.
I am making a diagonal blanket right now. I’m doubting the middle part… not that I don’t believe you it just feels gaat the decreases are soo much more than the increases…. I am making an adult size blanket maybe that is why it feels weird…
It will work, and I love how the blanket turns out in the end!