I’m sharing how to finish a quilt in today’s step by step tutorial! This is the easiest way that works for me, and I hope this tutorial will be helpful to you too.
I took on a new years resolution of sewing one quilt block every month. My goal was to have 12 blocks sewn by the end of the month, ready to be put together into a quilt top. And now it’s time to join those quilt blocks and see how to finish a quilt successfully!
How to finish a quilt with batting and backing?
An easy tutorial showing How to finish a Quilt
Total Time: 4 hours
1. Create a Quilt Sandwich
I loved the way my blocks looked together butted against each other. So I joined the 12 blocks to form a grid of 3 blocks by 4 blocks, and added a border around to make the quilt front.
Next lay your backing (this will form the quilt back) wrong side facing up, add the batting next and then lay the quilt front on top, right side facing up to create a quilt sandwich. I used fusible batting this time, which eliminates the use of pins to hold the quilt sandwich together, and instead I just ironed it all into place to avoid creases. You can also use a basting spray here.
Make sure your batting and backing fabric are larger in size than the quilt front for best results.

2. Sew all the layers together
You can sew all the layers togethers in many ways, here a the most popular 3
- Hand Quilting: Use a needle and thread and sew the layers together by hand with a simple running stitch.
- Machine Quilting: Use a sewing machine to sew straight lines and join the layerss
- Free Motion Quilting: Use a sewing machine with a free arm and walking foot which allows you to sew designs as you join the layers.
I chose to hand stitch to quilt my layers together. Hand Quilting can be a quite time consuming compared to other processes, but I enjoy hand quilting because it is my way of relaxing/ sewing while watching a tv show and one of the favorite parts of the quilting process. You can use a thimble to prevent your thumb from tiring out, its a personal preference.
I kept the sewing simple to speed up the process. I simply stitched around each of my blocks, using colored threads and a blind stitch. This is called straight line quilting. Tie off each area with a strong knot for durability. 
3. Trim the basted Quilt
After completing the Quilting process (also called basting) of your choice, use a Soft grip Pinking shears to trim the edges of the quilt neatly. Make sure all of your edges are straight and have sharp mitered corners. 
4. Bind off the Quilt
The last step is to Bind off the Quilt. Choose your binding fabric, cut long strips of it and iron folding in half width wise. These are called the binding strips. Here is my quick machine binding tutorial- pin one long ironed strip along the raw edge of the quilt. You want the raw edges of the quilt and the binding strips to match. Sew them together with a scant 1/4inch seam allowance. I then hemmed the folded-edge of the binding strips onto the back of the quilt neatly all around the entire quilt.
The starting width of the binding strips is your preference- I used a two inch wide long strip here, folded in half and ironed. Use your cutting mat and rotary cutter to create these long strips. 
ALSO READ: How to make a Puff Quilt in 5 simple steps + Tutorial VIDEO


My Quilt block a month recap:
My crafty goal was to sew one unique quilt block every month. And thats 12 quilt blocks all done now! Here is a close up of them all.
Each months’ block was trimmed to 8.5 by 8.5 inches, using an acrylic ruler or block. This yielded precisely square blocks, and so joining them together was very easy.

This crafty new year resolution was an amazing experience for me. It gives you a tangible goal to your creativity.


Conclusion:
How to finish a quilt is up to you really- do you tie the quilt or free quilt it? I did hand quilting in colored threads- red, ochre, and brown, but if you have a local quilt store, you might ask them to quilt it using a free hand sewing machine for you. You want to add a soft texture here and make sure that the excess batting is trimmed neatly.
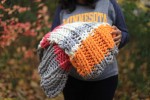
This quilt has become a family favorite now! It isn’t too big but is perfect as a lap quilt for me while I work at the computer. And needless to say, it’s the right size for the girls.
Thanks for stopping by today and I hope you enjoyed this How to finish a quilt tutorial!
I have seen that I work much better with a deadline or goal in mind. I am gemini, and by nature, I LOVE starting projects. At any given time I have atleast 5 or 6 half done projects around me. I love finishing projects too. It’s that in between time- where the end isn’t close enough, but the newness of the project has worn off- that I am bad at.