If you’ve ever wanted to try knitting but felt a little intimidated by the needles, the loops, or all the terminology, don’t worry. I promise, it’s much simpler than it looks. And once you get the rhythm, it becomes one of the most soothing, meditative crafts. Think of this how to knit beginners blog post as me sitting next to you, tea in hand, walking you through your very first stitches
With just a little patience, some yarn in a color you love, and a pair of needles, you’re well on your way to knitting your first cozy square (or scarf, or whatever feels fun).
Is it possible to teach yourself to knit?
Yes! Knitting is one of those crafts that feels so rewarding once you understand the basics. You can absolutely teach yourself, just follow along with this how to knit beginners post.
I would also suggest you also look at your local library, friends circle or family to see if you can find someone to help you start knitting. Think of the stories they would share with you. I grew up watching my mom making colorful blankets from yarn. I was fascinated, and learnt how to knit as a teenager and today, making and sharing Knitted Blanket Patterns is my happy place.
Affiliate links have been used at no extra cost to the reader. You can read my full disclosure here.
What do I need to knit for the first time?
- One pair of knitting needles (I started with size 10, nice and chunky so you can really see what you’re doing).
- A ball of yarn in a color that makes you happy (thicker yarn weight is best for beginners). A soft chenille yarn has a velvet like fiber content that makes this project soft to the touch!
- A pair of scissors [Yes, just the basics!]
For your very first pieces, I always recommend a shorter straight needle (like 9–10 inches) and a thick yarn — it helps you see your stitches clearly and feel your progress which makes the whole learning process feel a lot less stressful.
TIP: Make sure you are not purchasing circular needles for your first project!

how to knit step by step pictures
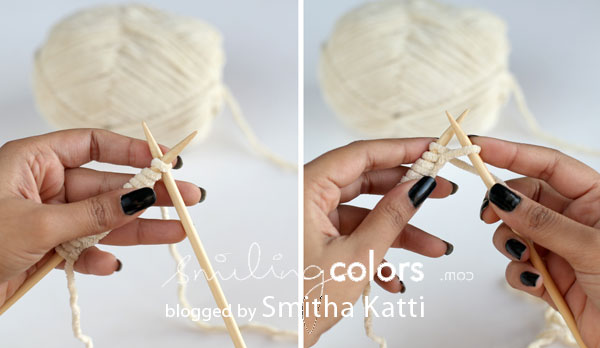
Step 1: Making a Slip Knot
Your project begins with a slip knot. Start by making a loop with your yarn as seen below. Insert your your thumb and pointer finger into this loop like you are about to pinch
The yarn that is connected to the yarn skein is called the running or working yarn, and the tiny bit of yarn on the other side of the loop is called the yarn tail.

Pull a little yarn through to make a second loop. Then slip that second loop onto your needle. Tug gently so it’s snug but not tight — you want your needle to slide comfortably.

Now slide the knot up till you have a somewhat tight stitch on your needle. There is no need to tighten it too much, tighten it just a tad. You have now made a slip knot and this is your first stitch!

I also have an in depth post with video tutorial elaborating on how to make a slip knot crochet or knitting.
Step 2: Casting On Your Stitches
Casting on is just how you get your very first line of stitches onto the needle. Think of it like laying the foundation for your project.
Depending on your project, say a small scarf or blanket, you will need to start your foundation chain accordingly. For a scarf here, we will make 15 starting stitches, if it were a blanket you would need more anywhere from 60 to a 100 and longer needles too!
Hold the needle with your slip knot in your left hand. Grip it between your thumb, pointer finger and middle finger. Pick up and hold the other empty knitting needle in your right hand.
Insert the right needle tip into (under) the first stitch on the left needle. With your right hand pick up your working yarn end and loop the yarn around the tip of the right needle. Pull this yarn through to make a new loop. You should now have one loop on your right needle. Slip this stitch from the right hand needle onto the left hand needle. You now have two loops on your left hand needle, and we count those as 2 stitches.


Repeat this motion of inserting needle, looping yarn, pull up a new loop, slipping stitch from the right needle onto left needle until you have cast on 15 number of stitches.

Step 3: Knit Your First Row
Okay, this is where the magic starts. Hold the needle with your cast on stitches in your left hand and the empty needle in your right hand.
Slide the right needle under the first stitch, bring your yarn around it, and pull a little loop through. Then slip the old stitch off the left hand needle and onto the right hand needle. When you are making the knit stitch, your stitches will switch hands.

You’re simply moving stitches from one needle to the other, one at a time, like a calm little dance. Repeat this across the row, and guess what? You’ve just knitted!
You have now knit your first row!

Continue in this manner, insert the needle, loop yarn, pull yarn through stitch, slip stitch off the left needle till all the stitches from the left needle have been transferred to the right-hand needle. This is the end of your row and can be counted as Row 1.
Keep going back and forth like this, and you’ll be working in garter stitch. This is one of the basic stitches and is great for new knitters. You just create multiple row of stitches, in this case just the knit stitch.
If you are making a scarf, you will be creating a long narrow rectangular piece of yarn fabric. Continue knitting each row, transferring stitches from one needle to another till you have achieved the desired length of your scarf.
How To Knit Beginners: I would recommend knitting row after row until you have almost (but not quite!) finished up the skein of yarn.
Step 4: Casting Off
Once you have a long enough scarf and you’re ready to finish, it’s time to cast off (basically sealing the edge so nothing unravels)it’s time to cast off the stitches.
Knit two stitches. Lift the first stitch over the second and off the needle. Knit another stitch, lift the previous one over it, and keep going until one stitch is left.
Cut your yarn, pull the tail through that last loop, and give it a gentle tug. You just finished your first piece of knitting!

Knit the next stitch and slip it off the left needle. As you did before, slip the farthest stitch. You should be left with one stitch remaining on the right-hand needle. Continue till you have knit and cast off all the stitches and only the last stitch remains on the right-hand needle. Cut the yarn leaving a small tail, and pull the tail through this final stitch.
Little Tips From Me to You
- Your first project doesn’t need to be anything. A simple little square is perfectly enough to learn on.
- Go at your own pace, slow and steady is perfect.
- Thick yarn is your best friend when you’re learning.
- If possible use bamboo needles, these make pulling the yarn loops easier.
- Your tension will look wobbly at first. Totally normal. Everyone’s first project turned out wonky. It is only with time and practice that you will learn how to create steady even stitches.
Is knitting easier than crocheting?
Crocheting uses only one hook whereas knitting has two needles. Learning how to knit beginners takes a little extra patience. I would not say it is hard to knit, it just has a slightly bigger learning curve. I am both a knitter and a crocheter at heart, but I have many friends who prefer crocheting better.
You’ve Got This
Knitting looks complicated from the outside, but truly, once you try it, it feels natural so quickly. And there’s something really joyful about watching your stitches grow row by row. You can make sweaters, socks, a simple scarf and so much more! A Garter Stitch Blanket is a great beginner knitters project that uses only the most basic stitch and a double stranding technique. In my next post I will talk about purling which is another popular stitch!
Follow Smitha Katti’s board Knitting and Crochet on Pinterest.
This tutorial was originally published on the Fiskars website


I have tried to learn to knit a few times and now it is cooler I think I will give it another go. Off to check out your tutorial.
Hi Smitha…. what kind of yarn is that…. the scarf looks so nice and soft. Thanks.
Prachi, that is the Lion brands Suede yarn. It really is soft and cuddly/