Turn a plain shirt into something special with this applique t shirt design! Whether you’re making a personalized gift or just sewing for your family, this project adds fun style to everyday tees.

What You’ll Need
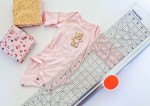
- Plain T shirt (any color or size)
- Fabric scraps
- Iron + ironing board
- Fabric Scissors, rotary cutter, Micro Tip Scissors, Pinking Shears
- Thread + sewing needle
- Sewing machine
- Iron on batting
Applique T shirt Tutorial
I tried an easy reverse applique t shirt technique today- you sew an extra piece of fabric (with batting to create a soft fluffy texture) beneath the T shirt, draw a design of your choice on top of the T shirt, sew around the design to hold the batting in place and then carefully cut away the top T-shirt fabric. When you cut out the T shirt and reveal the fabric beneath, the whole shirt is transformed!
Step 1: Choose Your Design & Create a Fabric Swatch.
Pick a share you want on your shirt, it could be a heart, star, monogram etc. Draw or print it out onto paper. Cut strips of your chosen fabric using the 60mm Rotary Cutter and an acrylic ruler. Sew these strips together to make a swatch of fabric larger than the printed monogram.
Step 2: Fuse Batting onto swatch.
Cut out your design, here I am using a monogram, carefully using a pair of Micro Tip Scissors. Next, iron some batting to the back of the swatch block. Trim the edge using a pair of Soft grip Pinking Shears
Step 3: Pin Fabric in Place and Sew
Place your paper monogram onto your T-shirt and center the design. Place the fabric swatch beneath the T shirt, making sure to leave a good inch of seam allowance all around the monogram design. Pin all three layers together. Using some embroidery floss, sew around the monogram completely using a simple running stitch.
Step 4: Trim T shirt Fabric to Reveal Fabric beneath
Once completely stitched, using a pair of Easy Action Rag Quilt Snip Scissors, carefully cut out the T-shirt material that lies inside of the monogram outline. Pull and lift the T-shirt material slightly while cutting making sure not to cut the quilted fabric beneath. This is the most satisfying step of reverse appliqueing

Decorate with buttons and you have learnt how to applique a t shirt!

I really loved the idea of reverse applique and tried them on these T-shirts for the girls. I used an alphabet monogram, and the alphabet I chose N has easy straight lines. I tried this with S too, and it is super easy to sew around.
If you try this out, tag me with your creation — I’d love to see it!
Read my original post of this tutorial on the Fiskars blog here.

Hi I’m Smitha! I live in Minnesota with my husband and two daughters. You’ll always find me painting florals in my sketchbook. And I love the sheer joy of making something with just my hands! But my bigger love is capturing it all on camera Read more.
Thanks for stopping by today! If you learnt something from this tutorial, do share this post with a friend or on social media! Tag me @smithakatti #smithakatti I’d love to see what you create!


that is adorable!! your girl is so cute!!
Great idea! Love it. The buttons the perfect embellishment. Your model also is perfection! (perfect behavior mom!)
So cute! Love these
This is such a creative and detailed guide on reverse applique! I love how it transforms a plain T-shirt into something personalized and textured. The step-by-step instructions, from layering fabric to careful cutting, make it easy to follow—even for beginners. Perfect for DIY lovers looking to add a unique touch to kids’ clothing!
Impressive! Thanks for sharing this.