Today I’m sharing a super colorful Rainbow Quilt tutorial idea and will show you how you can use the Drunkards Path Die Set to create a throw pillow for your home! There are so many variations you can create of this die set, it’s super versatile!
This post was created in partnership with Crafter’s Edge. All opinions, project ideas, and craftiness are my own 🙂
If you have never die cut before, I was happily surprised with the Crossover 2 die cutting machine and all it can do. I have to say since I have started die cutting fabric, I’ve been sewing so much more!
disclaimer: affiliate links have been used. This means that if you make a purchase I might earn a small commission at no extra charge to you.
Supplies you will need:
- Crossover 2 die cutting machine
- Drunkards Path Fabric Cutting Die set
- A sewing machine
- Fabric Quarters in colors of your choice
- Sewing or quilting pins
- A pair of scissors
- Iron or steamer
- Pillow insert

HOW TO ASSEMBLE THE Drunkards Path:
I started by die-cutting all of my pieces. For the rainbow colors, I’m actually using fabric scraps left over after die-cutting my Rainbow quilt. Read more: HOW TO SEW A COLORFUL TRIANGLE QUILT USING DIE CUTS
If your fabric is wrinkly, definitely take the time to iron or steam it before die cutting for best results.
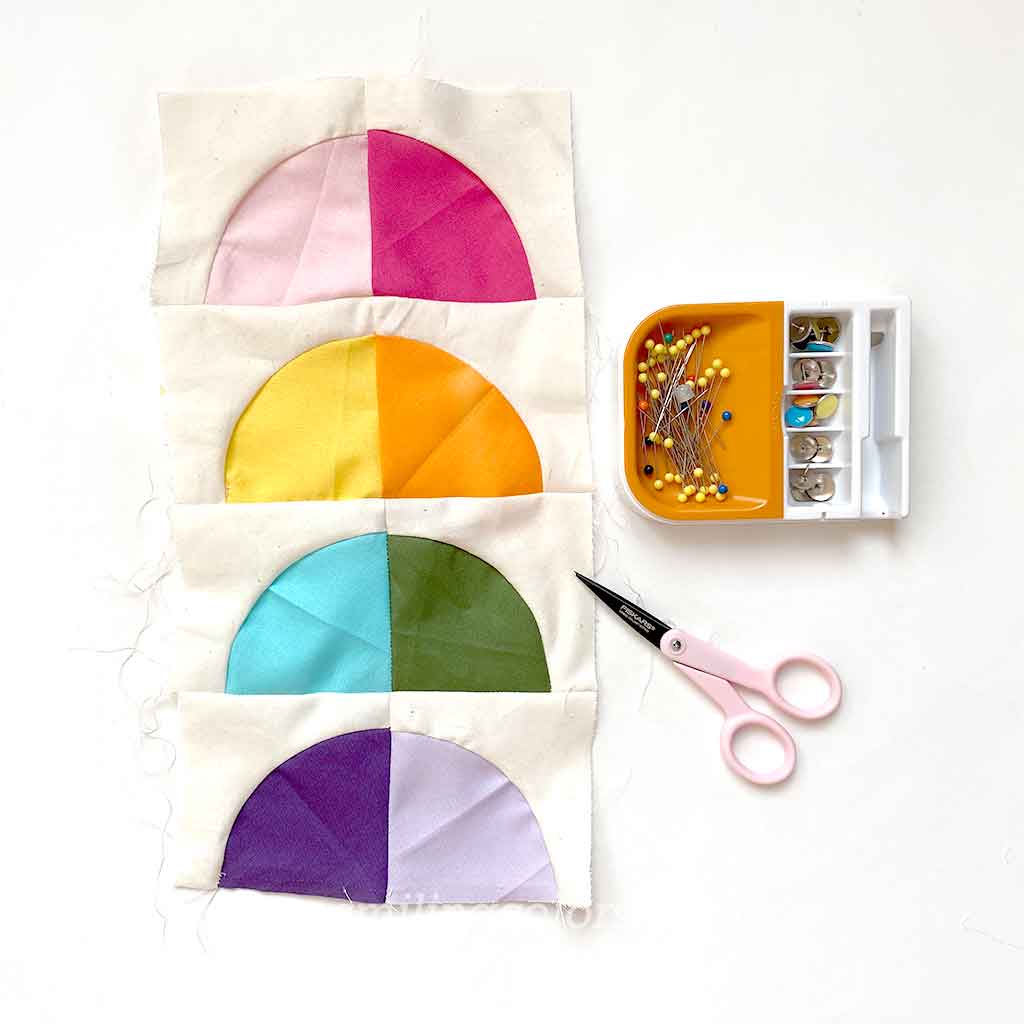
The Drunkards path has two pieces- both of these have a curve, but when sewn together form a square.


How do you sew curved pieces together?
The main challenge in a Drunkard’s path pillow is sewing the curved pieces together. This is not difficult once you figure it out- and if you have ever sewn garments- this is exactly like sewing a sleeve in the arm hole.
Place the two fabric pieces as seen in the photo below, and sew into place slowly while gently moving the colored piece into the curve.

Continue in this manner till you have all of the rainbow squares sewn! The colored curve against the white fabric just makes me so happy!

At this point, you have many options. You can arrange your blocks together in few different ways and each one will give a unique look. I tried arranging the blocks in the 3 ways pictured below and finally settled on option 3.

Create two panels of the option 3 and then sew them together. This forms our pillow front.
To create the back of the pillow, I overlapped fabric to create a closure mechanism, then pinned everything together and sewed on the top and bottom. Reverse the fabric and you have a pillow cover!
Just stuff your cover with a pillow insert and enjoy 🙂


TIPS:
- Die cutting is a breeze with the Crossover 2 Machine, and you can easily die cut 3 to 4 layers of fabric at once. This makes assembling the Drunkards path pillow super easy!
- Work in an assembly line. First die cut all of your colors, then your whites. Start sewing the curves, and then sew the blocks together. Assembly line makes it go faster.
- Try/ practice sewing the curve into place on a few pieces of scrap fabric first. After two blocks, I felt comfortable to start sewing my pretty fabric.
- Choosing fabric is the best part of this project! For me Rainbows is the way to go, but this pattern would look beautiful in any color scheme of your preference.

rainbow quilt tutorial Conclusion:
I thoroughly loved using this Drunkards path die set! It makes cutting fabric a breeze and there is no calculating and drawing out curves. The cut fabric pieces fit snuggly into place and it becomes so much more fun to put the pieces together. I highly recommend you give it a try!
For me this rainbow pattern with two shades of color seemed like a great modern twist to the Drunkards Path. What do you think? Let me know in the comments below please!