I’ve only made quilts so far using square blocks or long skinny rectangle strips. Today I’m starting a new project a quilt with triangles and I’m excited to see how this turns out!
This post was created in partnership with Crafter’s Edge. All opinions, project ideas, and craftiness are my own 🙂
Step one is to cut out all of the fabric triangles. I’m using a die-cut machine and die cutting fabric makes perfect triangles each and every time.

disclaimer: affiliate links have been used. Which means that if you make a purchase I might earn a small commission at no extra charge to you.
Supplies you will need:
- Crossover 2 die cutting machine
- Equilateral Triangle die set
- A sewing machine
- Fabric Quarters in colors of your choice
- Sewing or quilting pins
- A pair of scissors
- Iron or steamer
- A seam ripper will definitely come handy 🙂

During this pandemic, I’ve painted a lot of rainbows and that is reflected in my color choice for today. I chose a rainbow of fabric quarters and challenged myself to try something I hadn’t before. To sew triangles together to form a colorful Rainbow Triangle Quilt top. I enjoyed the satisfaction of putting together a triangle quilt- something I never had before and here’s how I made it.
How to sew a quilt with triangles
Fold your fabric quarter into thirds and then fold it in half twice on the opposite direction. You will be able to die cut 12 perfect equilateral triangles from this in just 4 passes through the Crossover 2 Die Cutting machine. With my cotton fabric I was able to cut 3 to 5 layers of fabric at once.

The most important thing to keep in mind while die cutting fabric is that you use the metal adapter plate in your die cutting sandwich. That does all the work for you.

Since you fold and die cut the fabric, you will be left with a fabric cut out that still has use! No fabric scraps here. I found that the two smaller size triangles would easily fit in the leftover space.

Similarly die cut triangles from a neutral colored fabric like white or beige.
TIP: Try sewing a few test triangles on scrap fabric till you get it right. Or keep a seam ripper close by!

To sew the triangles together- arrange the die cuts as seen in the image below. The slight notch that you see instead of a triangle point needs to be in opposite directions. Using your sewing machine, join the triangles with a 1/4th inch seam.
TIP: It’s super important to maintain that little space beneath each triangle point. That is your seam allowance to join the rainbow rows together.

I went in rainbow order and alternated one color with with cream fabric to create each row. You can choose to either line up or stagger your triangles will attaching the rows of triangles together.

And you repeat this. For all of the colors you want. This would make a great ombré quilt as well!
A beautiful triangle quilt needs a little bit of precision in the cutting of fabric. By using a die-cut machine for my fabric cutting, I got precise triangles ready to be sewn together in a few easy steps.
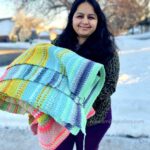
Here is my finished Rainbow Triangle Quilt top! Not all of the triangles are perfect but most of them are close. I love how the rainbow colors pop in contrast with the cream and the triangle shape adds such a modern colorful vibe.

I need to find a nice colorful pattern for the back of the quilt and then will either hand quilt or tie off the quilt to finish it. You can see how I like to usually finish off my quilts in this previous blog post here.

Inspiring you with simple doable Art and Craft ideas and tutorials that will encourage you to use your supplies, get messy and find your creativity.