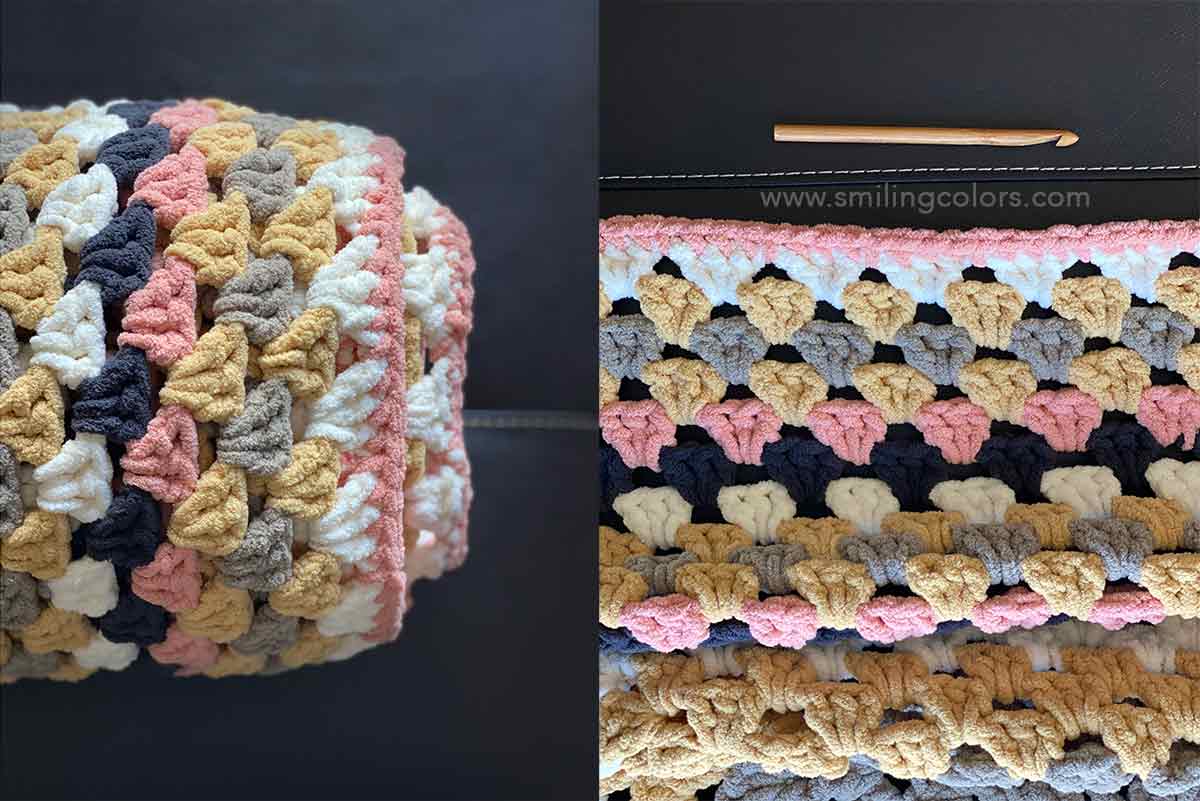
Let’s make an Easy Center Start Crochet Blanket using the cuddly Bernat Blanket Yarn. I’m sharing a super simple pattern today just like your favorite Basic Granny Square Pattern.
How many skeins of bernat blanket yarn do I need for a blanket?
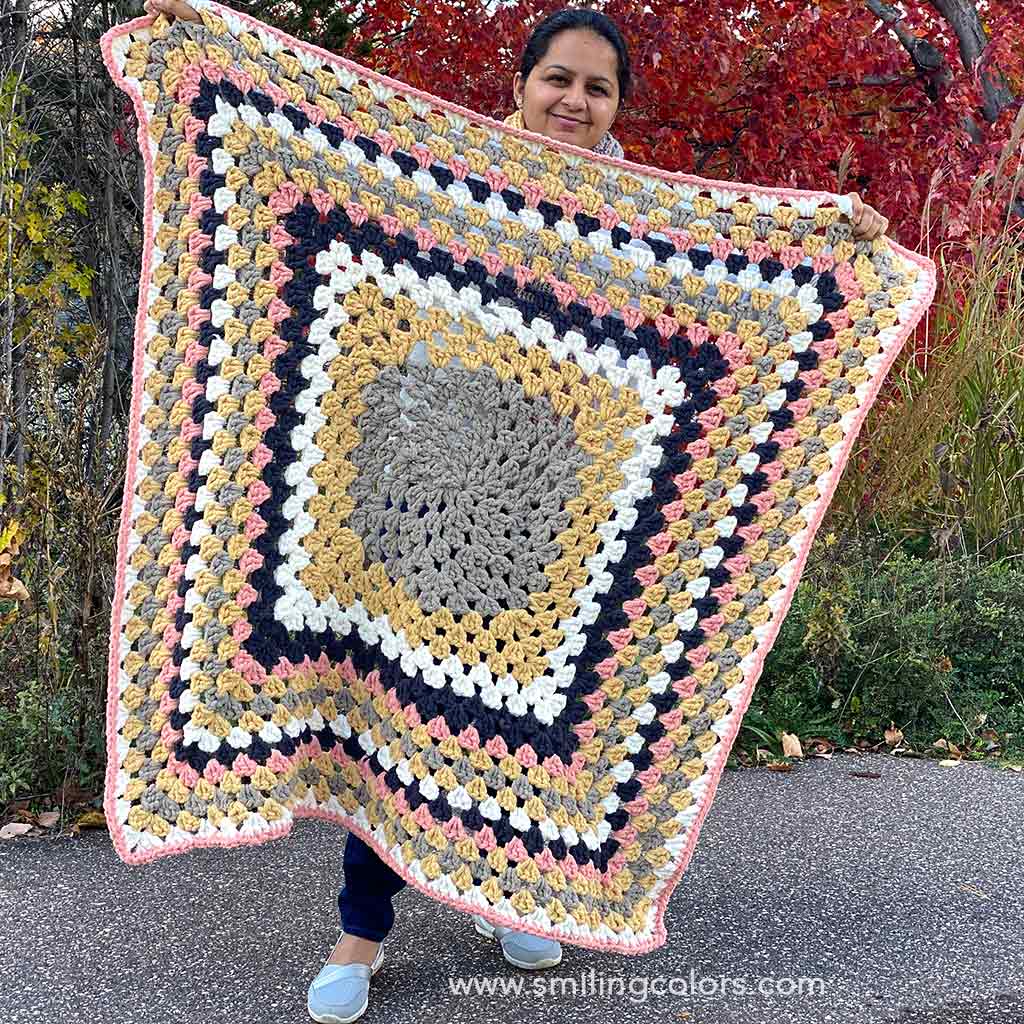
For my blanket which measures approximately a 46 inch square, I used
- 3 skeins of Bernat Blanket O’GO Yarn, Milk and Honey https://amzn.to/30KKscX
- 2 skeins of Bernat Blanket O’GO Yarn, Rose Gold https://amzn.to/3HDBuin
- You can alternately use skeins of Bernat Blanket yarn https://amzn.to/3kS6wJy
Center Start Crochet blanket:
Abbreviations used (US): ch= chain, dc= double crochet, tr= treble
If you are just learning crochet, you will need to know how to chain and how to make the double crochet for this blanket.
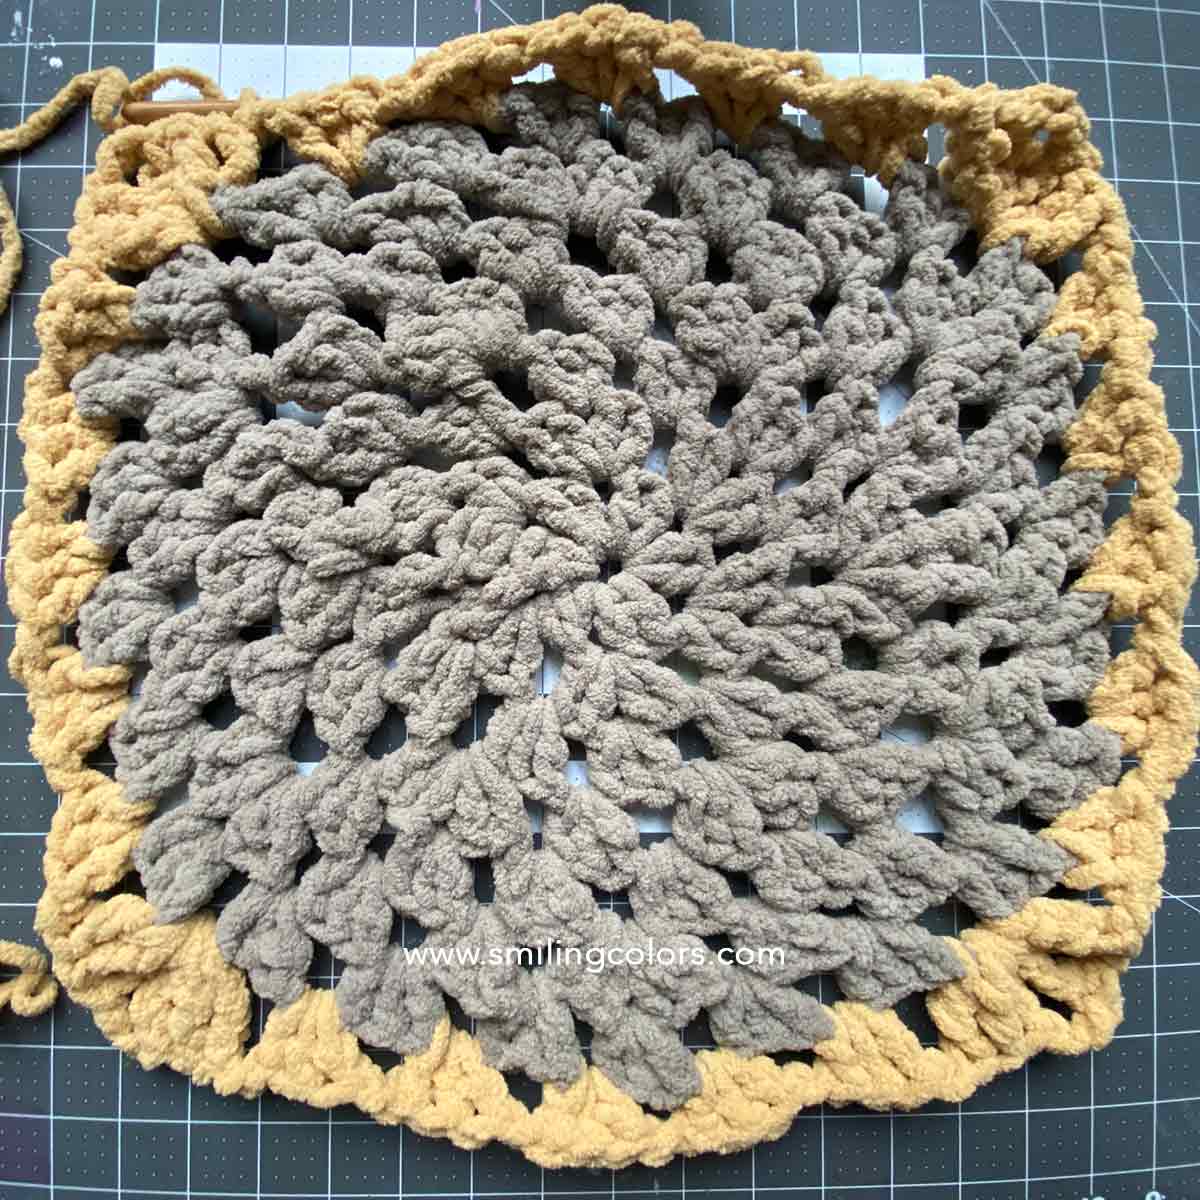
With a US size L/11 8mm crochet Hook and the Milk and Honey colorway we start by creating a circle.
Start with a Ch 4 and slip stitch into the first chain to form a loop. Alternately you can also start with a magic loop.
Round 1: Ch 2 (counted as a dc), 2dc into center loop, ch 1 then *2dc, ch1 into center loop* 5 times, complete round by joining circle to the top of the initial ch 2 with a slip stitch (6 clusters)
Round 2: *Ch 2, dc, ch1, 2dc, ch1* into chain 1 space below, then repeat *2dc, ch1, 2dc, ch1 into next ch 1 space* 5 times, complete round by joining circle to the top of the initial ch 2 with a slip stitch (12 clusters)
Round 3: *Ch 2, 2dc, ch 1* into the chain 1 space below, then repeat *3dc, ch1 into next ch 1 space* 11 times, complete round by joining circle to the top of the initial ch 2 with a slip stitch (12 clusters)
Round 4: *Ch 2, 2dc, ch 1, 3dc, ch1* into the chain 1 space below, then repeat *3dc, ch1 into next ch 1 space, 3dc, ch1, 3dc, ch1 into the second following chain space* 5 times, 3dc, ch1 into last ch 1 space, complete round by joining circle to the top of the initial ch 2 with a slip stitch (18 clusters)
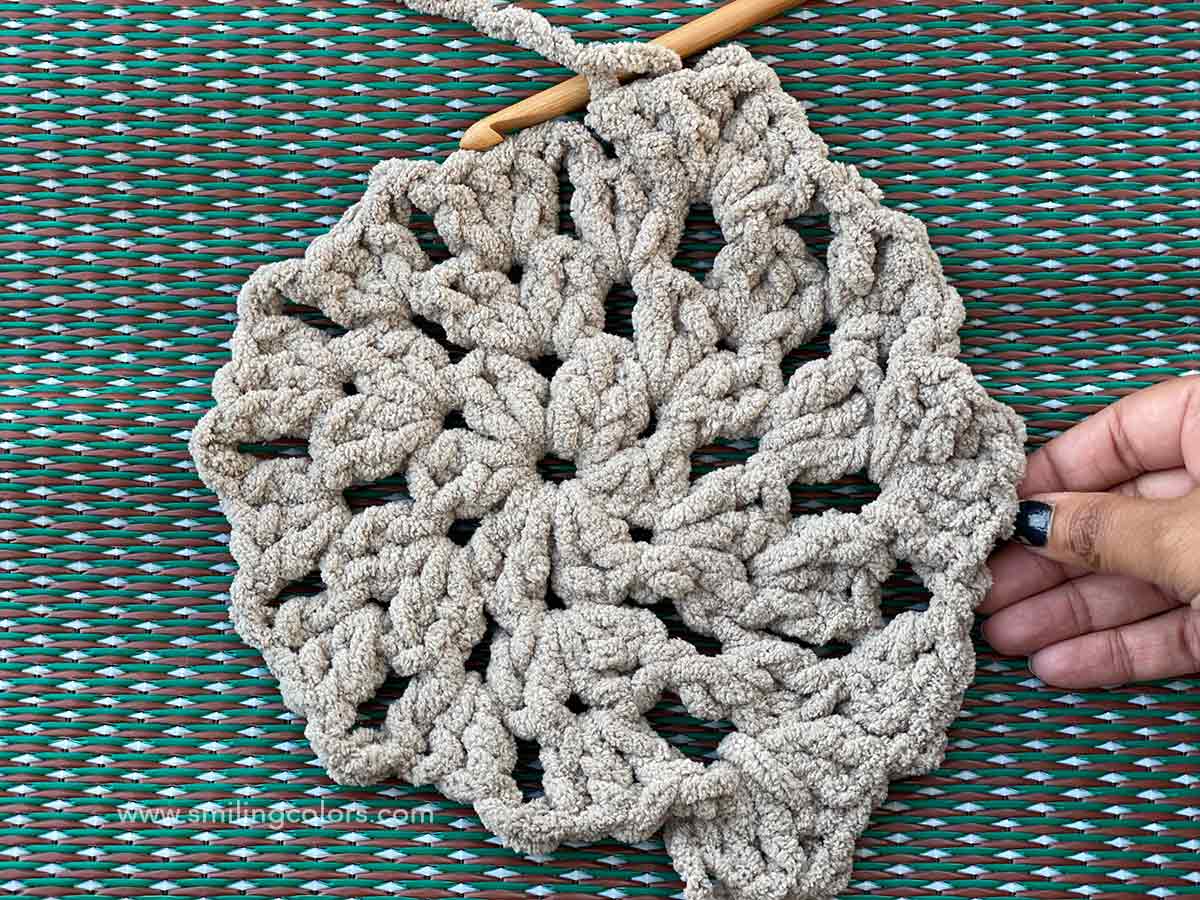
Round 5: *Ch 2, 2dc, ch 1* into the chain 1 space below, then repeat *3dc, ch1 into next ch 1 space* 17 times, complete round by joining circle to the top of the initial ch 2 with a slip stitch (18 clusters)
Round 6: *Ch 2, 2dc, ch 1, 3dc, ch1* into the chain 1 space below, then repeat *3dc, ch1 into next ch 1 space, 3dc, ch1 into the second following chain space, 3dc, ch1, 3dc, ch1 into the third following chain space* 5 times, 3dc, ch1 into last two ch 1 spaces, complete round by joining circle to the top of the initial ch 2 with a slip stitch (24 clusters)
Round 7: *Ch 2, 2dc, ch 1* into the chain 1 space below, then repeat *3dc, ch1 into next ch 1 space* 17 times, complete round by joining circle to the top of the initial ch 2 with a slip stitch (24 clusters). Cut grey colored yarn and join yellow with a knot.
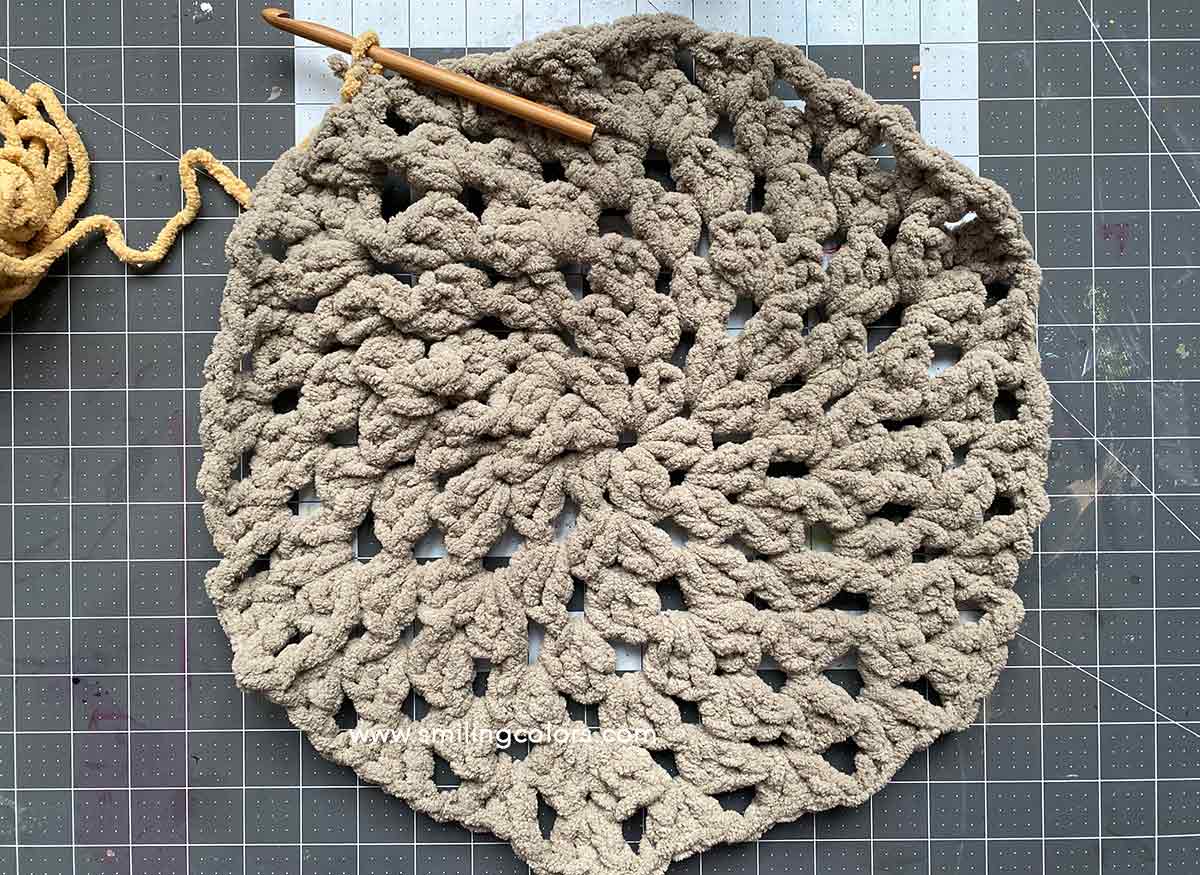
Now we turn this center circle into a square. I have shared this tutorial before as well, so feel free to refer to the method here GRANNY SQUARE CIRCLE CENTER PATTERN WITH EASY STEP BY STEP
For this bulkier yarn I needed to create corner clusters with trebles. Below is the pattern
Round 8: Circle to Square Row: With yellow yarn, insert hook into any ch space of below circle and join with a slip stitch. Ch3 into the same ch space, 2tr, ch2, 3tr, ch1This forms the first corner of our square. Next *3dc, ch1 into next ch sp below 5 times, into the next ch space, 3tr, ch 2, 3tr, ch1* 3 times. Then 3dc, ch1 into next ch sp below 5 times, complete round by joining to the top of the initial ch 3 with a slip stitch (28 clusters)
This might appear like a wonky square, but it will lay flat beautifully as we continue to grow the blanket!
Round 9 (repeat this row till the blanket is the size you need it to be)- Join yarn into any Ch1 space, Ch2, 2dc, Ch1, *3dc, Ch1, into each Ch1 space* and into each corner Ch2 space *3dc, Ch2, 3dc, Ch1* join with a slip stitch to starting Ch2.
what size should my crochet blanket be?
The beauty of a Center start Crochet Blanket like this is that you can make your blanket as large as you need it to be. Or you can just keep crocheting till you run out of yarn!
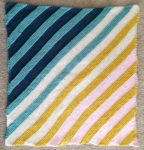
Below, I’ve used 4 skeins of the O’go Yarn Bernat Blanket, alternating Milk and Honey colorway with Rose Gold. As the colors were highly contrasting, like white against black, I chose to manually color pool. 4 skeins will give you a 40 inch square blanket, with a bunch of leftover yarn balls.
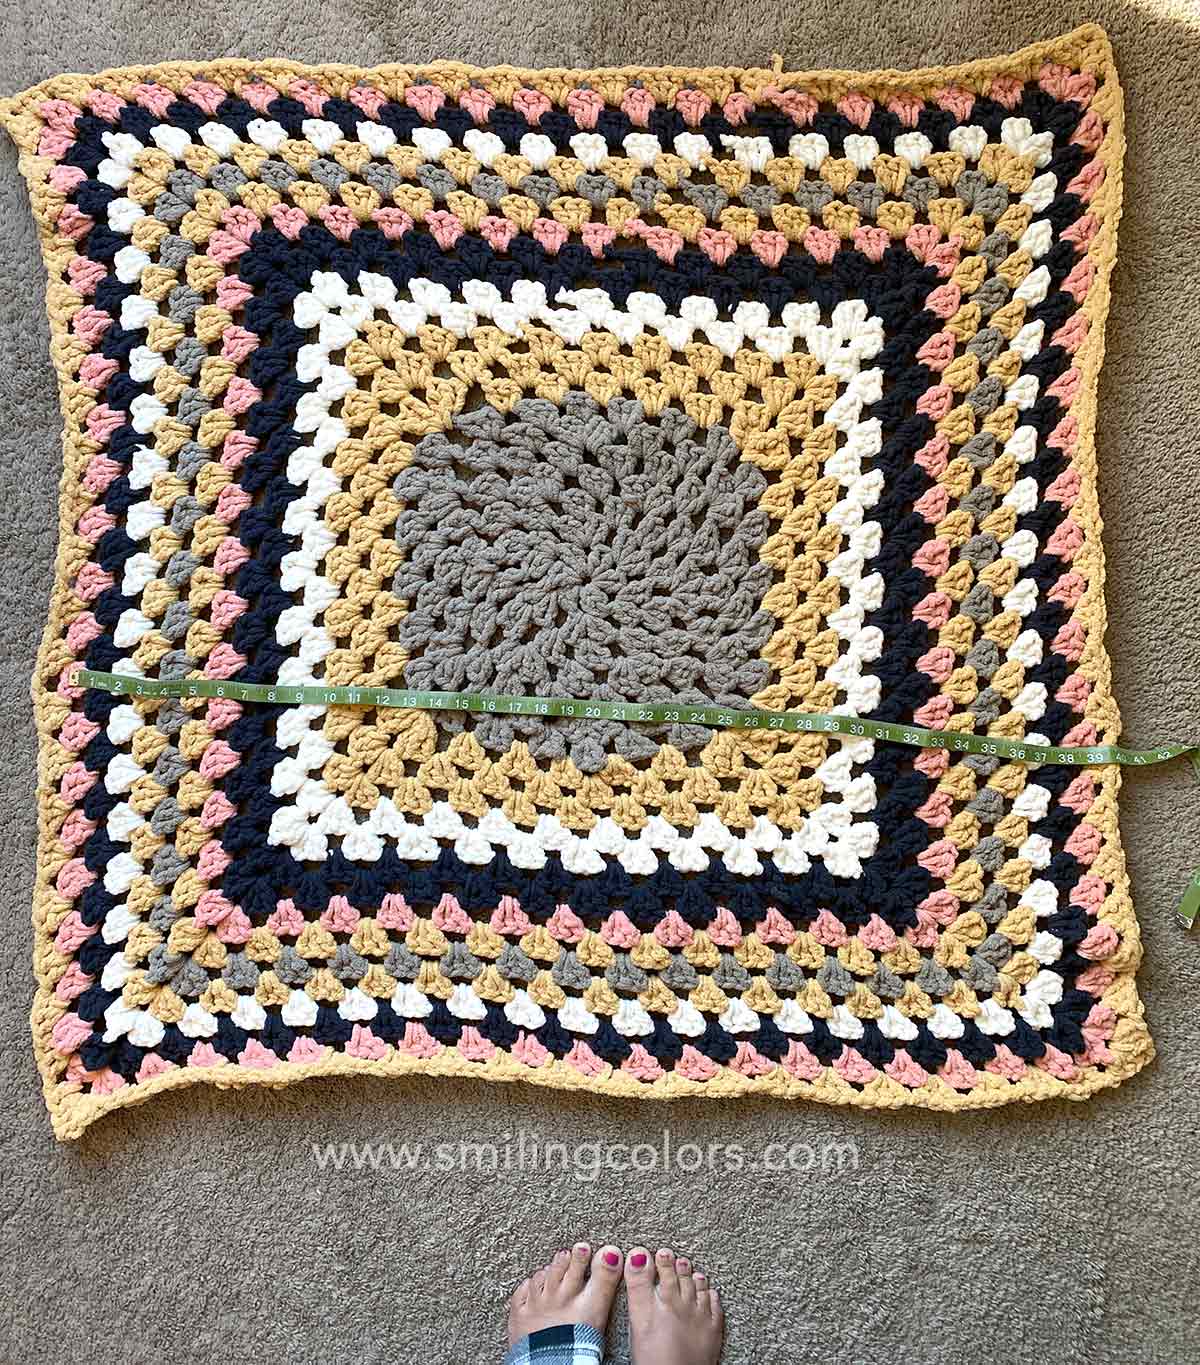
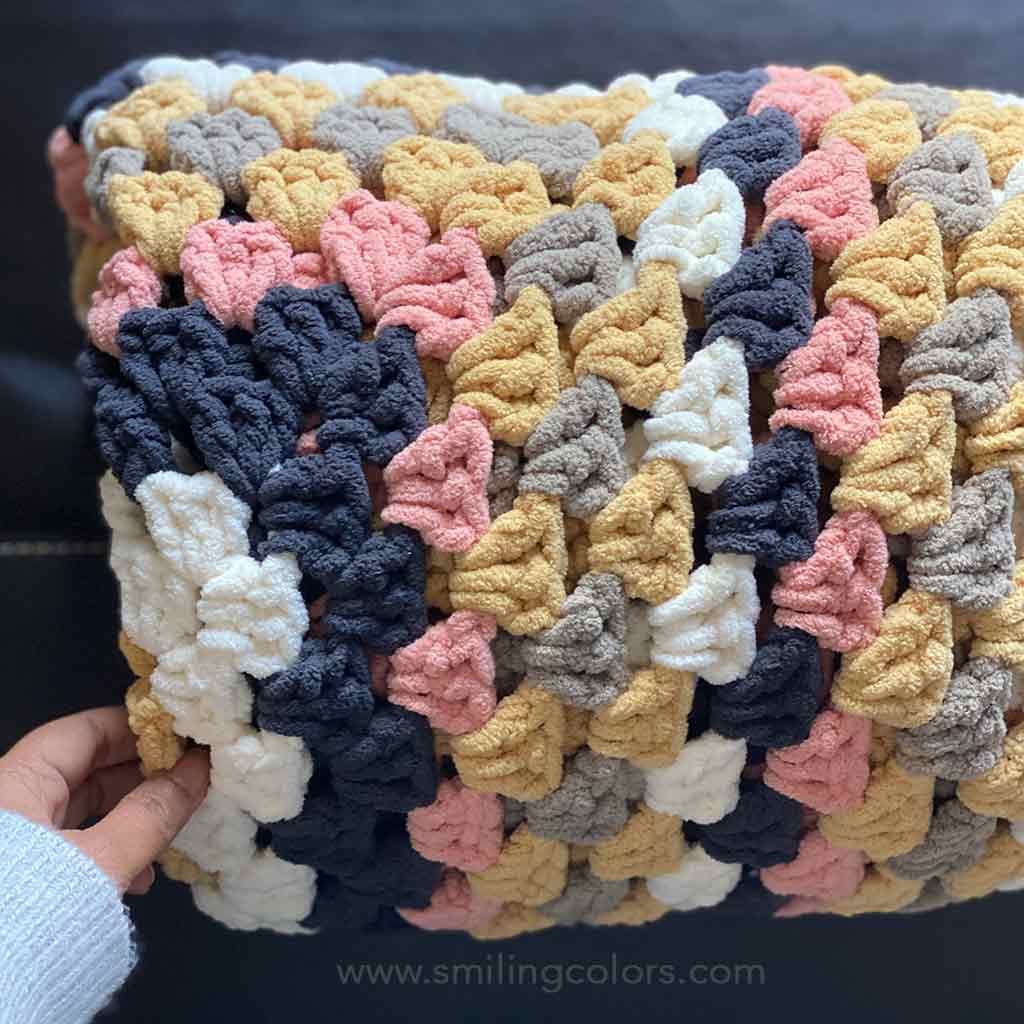
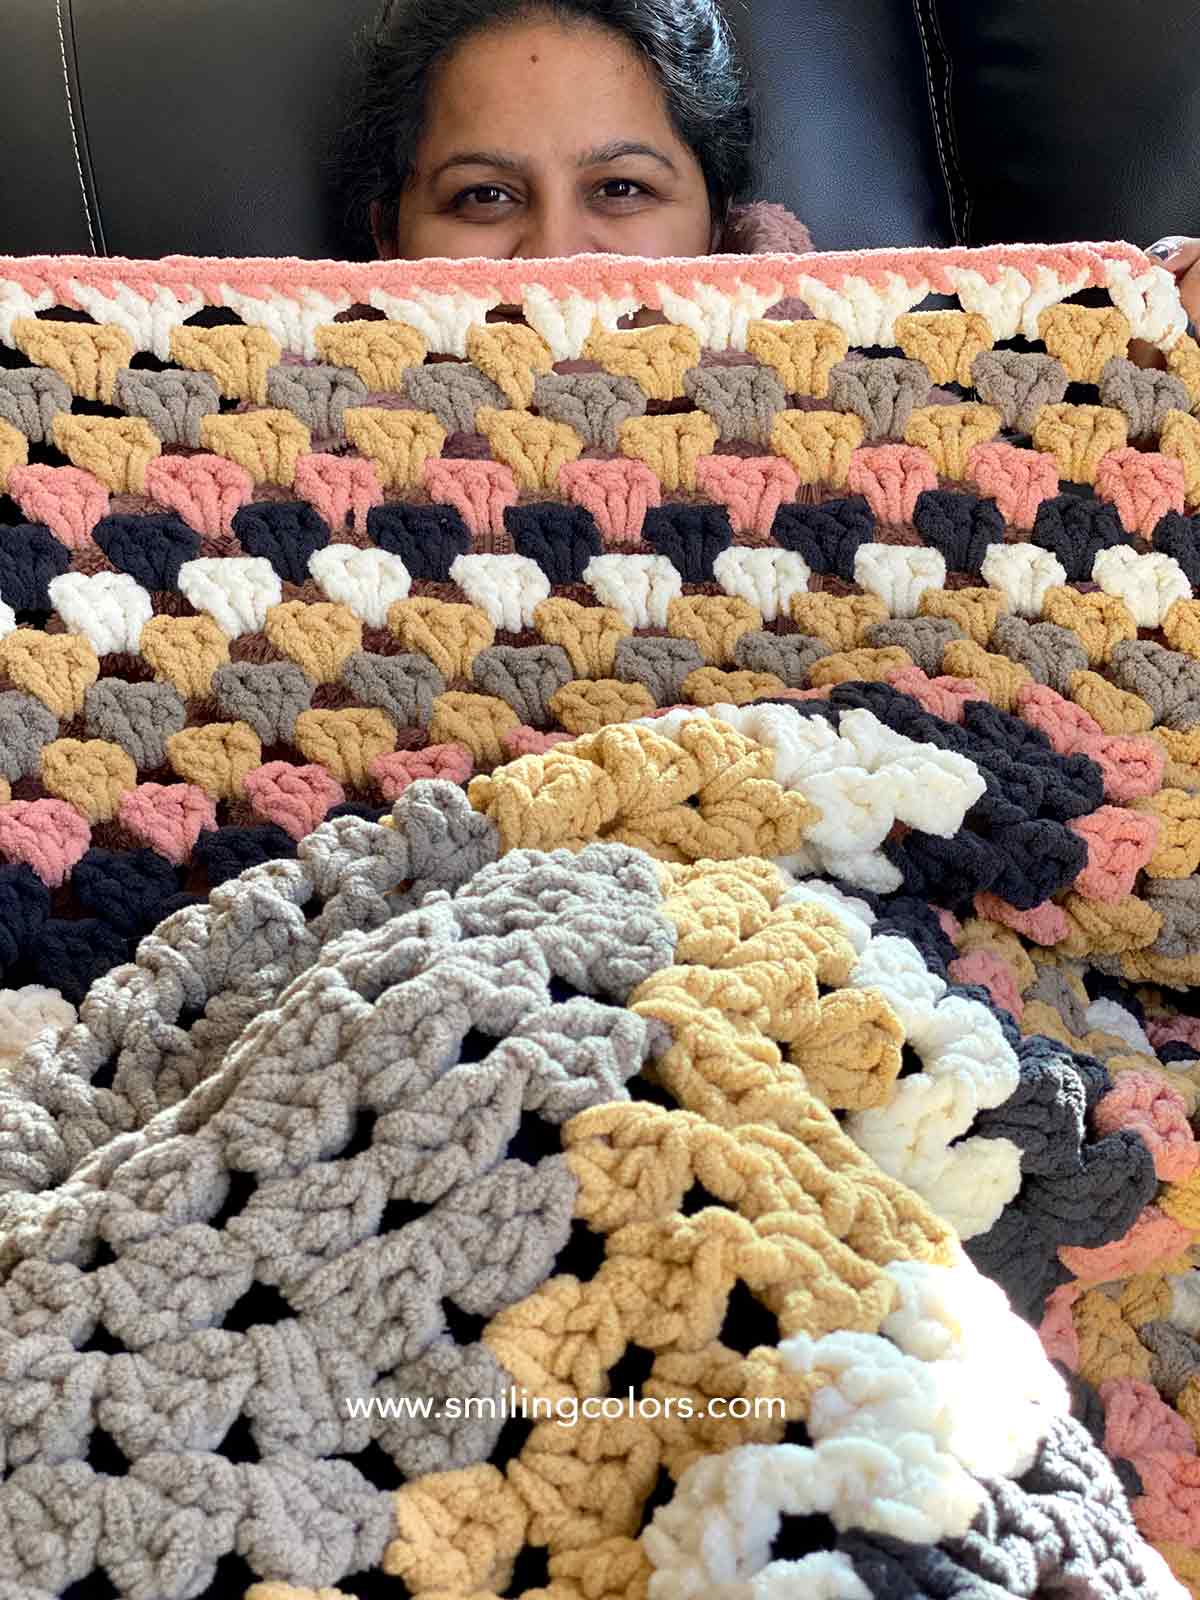
My FINISHED center start crochet blanket:
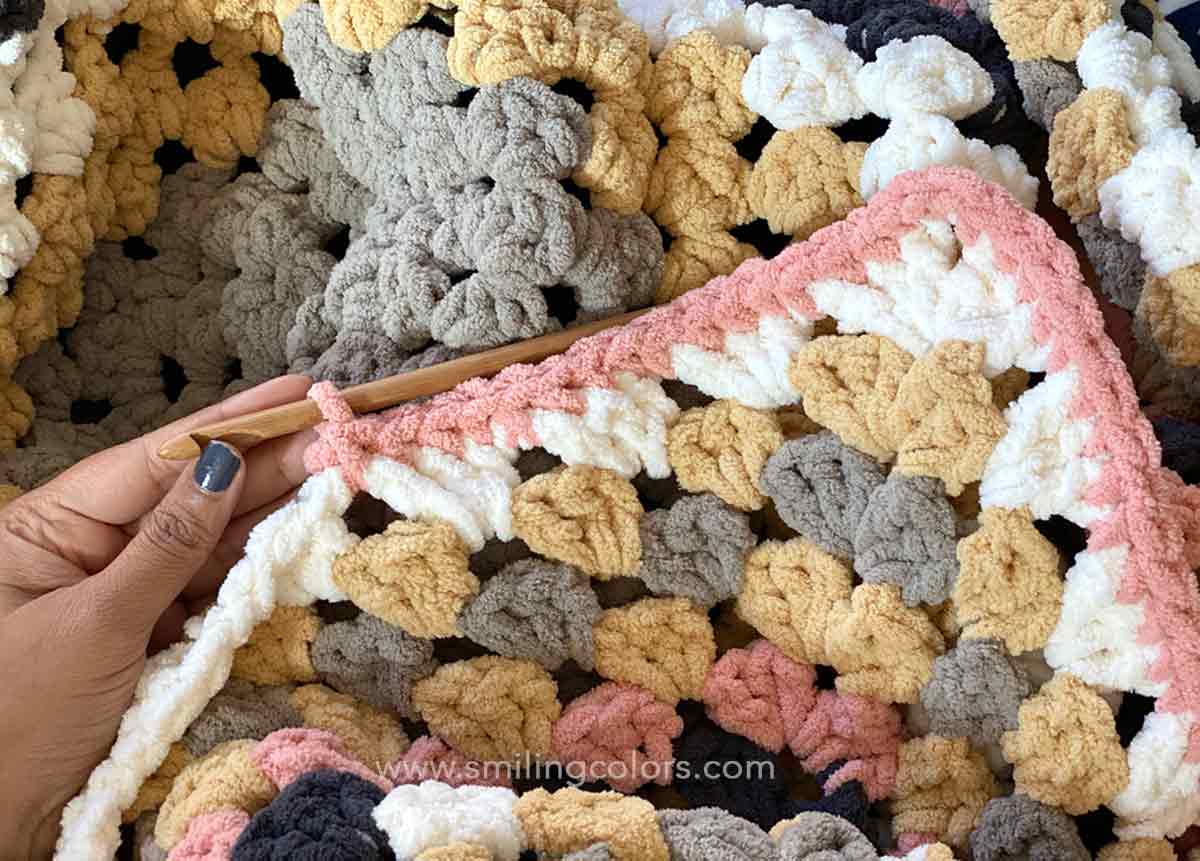
To finish off my blanket, I added a crochet border with the leftover pink yarn. Simply single crochet into each of the dcs, and then make an sc into each of the ch 1 spaces too. Into the corners, you will want to make 3 scs each. Here is a tutorial showing you how to single crochet.
I love how simple this blanket was to make and how beautiful if turned out!! It is such an easy pattern, you don’t have to pay attention while making it, yet the color changes make it an interesting project.
center start crochet blanket Video:
Enjoy my Center Start Blanket video where you can see how this Center Start Crochet Blanket comes together!
If you are curious about this new donut shaped yarn, check out my full O go yarn review for more info

I tried making this and the first time that I washed it, the entire blanket fell apart. The middle was completely ripped out of it, and there was no salvaging the yarn or the blanket. It’s a bummer because I was really hopeful it would be a good one.
Oh no!!! That is so horrible! Did you start with a magic loop or a chain 4? I’ve been seeing so many others sharing that the magic loop might be failing over time.