I’m experimenting with the Watercolor Salt technique today- and sharing two examples using two different salts. I found out they both give beautiful results and am sharing my simple process with you all.
Hello friends! Continuing my rainbow art series, this time I am creating a rainbow background that you can leave as it or use a background for hand lettering quotes.

Supplies you will need
- Watercolor markers: I’m using my Tombow Dual Brush Pens here because these are my go-to pens! You can use ANY watercolor paint you have at home. For #100daysofrainbow🌈 project that I am doing this year on Instagram, I’ll mainly be using these 12 pen colors – 755, 885, 933, 985, 133, 173, 379, 403, 526, 685, 817, 772
- Paintbrush or Water Brush: To create this airy background effect you need a larger paintbrush, I’m using a Round 12 paintbrush.
- Masking tape: After multiple bad ones, I have finally found this paper tape that is slightly tacky and doesn’t rip the paper.
- Salt (Read FAQs below)
- My Sketchbook is this Strathmore Mixed Media Sketchbook

Step by step Watercolor Salt technique
Step by step watercolor salt technique tutorial. Here I’ve trimmed down my DIY Bookmark from this 140lb paper.
1. Tape your watercolor paper down:
I’ve taped my watercolor paper onto an old plastic cutting board here. You can tape the paper down to any hard surface. This not only helps hold the paper down while painting, but also prevent the paper from warping with all the excess water we will be adding.
Add your marker colors in rainbow order onto the watercolor paper

2. Paint with water
Working quickly, paint over each color area separately with lots of water. The water will meet and blend the colors naturally.

3. Keep the color wet
It is very important for this Watercolor Salt Technique that the paper and watercolor be wet, not just damp. The more water you leave on the paper the more dramatic the salt effect will be.

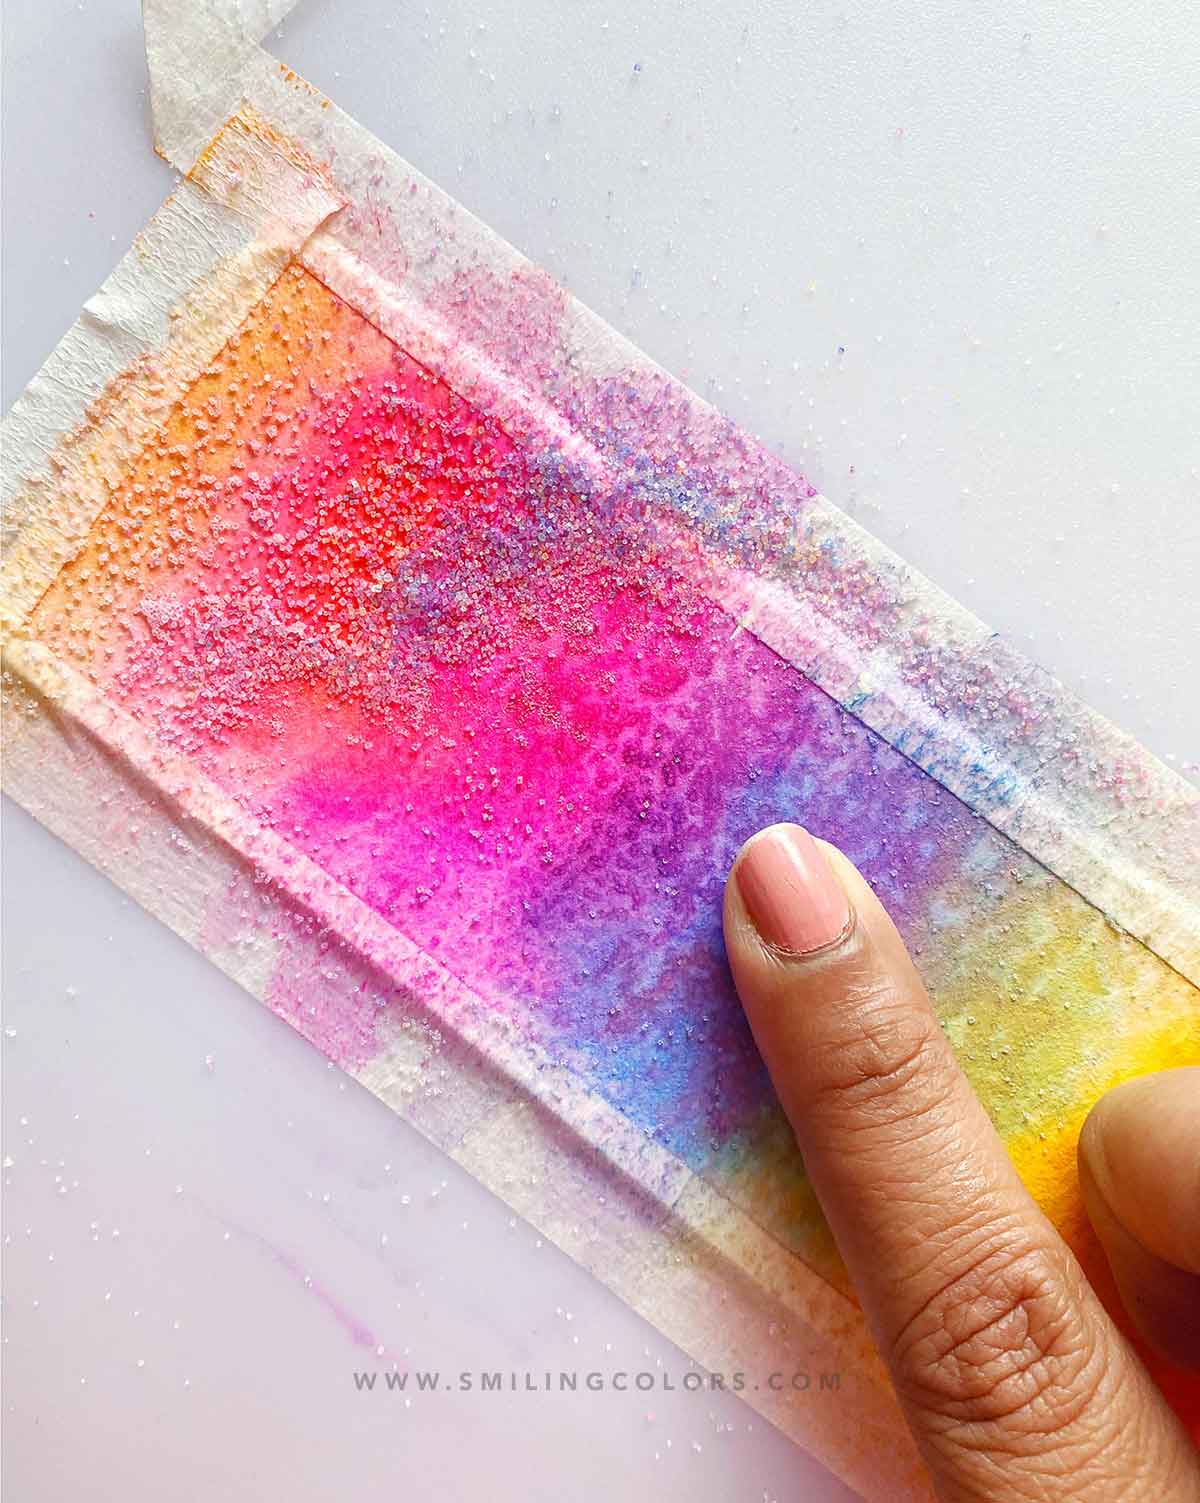
4. Sprinkle salt generously onto the wet watercolor

5. Let the salt dry on the paper
This step my friends is where I fail most often! Letting it dry. Do not try to rub off the salt before the watercolor has dried! This will just minimize the salt effect. For the best effect, let the salt dry for more than a few minutes. I let it dry overnight this time.

6. Rub off the salt using your fingertips
After the paint has dried, you can easily rub off the salt with your fingertips. You might find some salt trying to adhere to the paper, but it will rub off if you make it.
Here’s another example!
Here’s another example I created in my sketchbook. This background has so much depth and interest thanks to the Watercolor Salt Technique.
I painted this two page spread in my Strathmore Mixed Media sketchbook. I love the soft color spread that was so easy to create with all this texture!


Watercolor Salt using Gelatos
For this page, I used my Faber Castell Gelatos to create the Watercolor Salt effect and the colors do not disappoint! Watch this Watercolor Salt using Gelatos video to see the page come together from start to finish.

More Watercolor techniques:
If you enjoyed today’s Watercolor Salt process here is list of other Watercolor Techniques that are just as easy and will produce fun results! Give them all a try and let me know which ones are your favorite!
- Watercolor Splash Technique: Create soft flowy color bleeds in this simple tutorial.
- Tape Resist Painting: Create really simple white stripes in your art with this tutorial.
- Watercolor Crayon Resist: The cheapest and simplest way to resist watercolor and white spaces in your art.
FAQS
What does the salt do?
The salt acts a resist of sorts. The area where the salt touches the paper will be lighter in color. The salt will push the watercolor pigment away and thus the lighter spot will be surrounded by a darker shade. All of this happens in a few minutes and looks so natural and beautiful!
Does it matter which salt I use?
I’ve tried experimenting here using basic iodized salt as well as with fancy sea salt. Both salts seem to work for this technique!
Does this watercolor salt technique work with all watercolors?
This technique works with most watercolors I’ve used, but always test in a small area to make sure it works first.
What papers work best for this technique?
Watercolor paper! It is very necessary to use a good thick quality watercolor paper. You need the watercolor to be nice and wet for the salt, and thus the paper you use should be able to hold the water without warping or buckling easily
Any tips to prevent paper warping?
One of the best ideas to prevent warping is to tape your paper (or sketchbook edge) down while painting and then letting the paper dry completely to the touch before peeling the paper. This lets the paper dry flat.

Thank you for Pinning this tutorial!

Hi I’m Smitha! I live in Minnesota with my husband and two daughters. You’ll always find me painting florals in my sketchbook. And I love the sheer joy of making something with just my hands! But my bigger love is capturing it all on camera Read more.
Thanks for stopping by today! If you learnt something from this tutorial, do share this post with a friend or on social media! Tag me @smithakatti #smithakatti I’d love to see what you create!