I’m adding a simple twist to the Basic Granny Square Pattern, to turn it into a longer rectangle shape. This Crochet Granny Rectangle is just as easy to crochet and super fun!
In today’s post, you’ll learn how to crochet granny rectangle that is very easy to make. All in all, I have four posts to help you learn to create shapes – a basic granny square pattern, crochet coaster, a crochet hexagon and now a crochet granny rectangle.

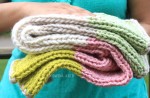
This crochet granny rectangle pattern works up quickly and you can then join a bunch of these granny rectangles to form a blanket. Blankets are my favorite thing to make, it keeps my hands busy and I share a lot of Free Crochet Blanket Patterns
Supplies needed:

- Size H or I crochet hook– these are 5mm or 5.5mm in size. Use a crochet hook size recommended for the type of yarn you are using. I have started using an ergonomic crochet hook my wrist feels less fatigued with these.
- Yarn– I just picked up random scraps of yarn today for this crochet granny rectangle. Any worsted weight medium (4) yarn will work beautifully here. I’ll list the exact colors at the bottom of this post.
crochet granny rectangle Tutorial:
If you are beginner, check out my learn to crochet post, followed by how to chain and how to double crochet before you begin this pattern.
Terms used (US): ch= chain, dc= double crochet, sl st= slip stitch. One cluster = 3 double crochets.
The center row goes like this: With Color A make a slip knot. Learn How To Make A Slip Knot Crochet
Ch 4. Join to the first ch with a sl st to make a circle/loop (or alternately make a magic loop).
Ch 2, 2dc into the loop (this forms the beginning cluster), ch 2,*3dc, ch1* 2 times into the loop, 3dc, ch2, 3dc, ch2 into the loop, *3dc, ch1* 2 times into the loop, 3dc, ch2. Join with a slip stitch to the starting ch2.
This completes the round and forms the center. Change to Color B and cut off Color A leaving an one inch tail.
The first round will look a lot wonky, but don’t worry, once you work round 2 you will start seeing the rectangle shape forming.


Next rows: Join another color with a slip stitch anywhere. Crochet 3dcs in between each cluster from previous round, and in each corner ch 2 space crochet *3dc, ch2, 3dc*
In this granny rectangle pattern, I crocheted clusters of 3dcs without a ch1 space. This makes the hole spaces in between clusters a bit smaller. If you are used to the 3dc, ch1 granny, that works just as fine here and you can continue with that.

crochet granny rectangle Pattern PDF:
You can download the FREE pattern here —> Granny Rectangle Pattern Pdf (opens in a new window) Please do not resell or distribute.
Follow Smitha Katti’s board Knitting and Crochet on Pinterest
NOTES AND TIPS:
- For a taller crochet granny rectangle, you would have to adjust the foundation row. Start with a ch 6, join to the first ch with a sl st to make a circle/loop (or alternately make a larger magic loop). Then Ch 2, 2dc into the loop (this forms the beginning cluster), ch 2,*3dc, ch1* 3 times into the loop, 3dc, ch2, 3dc, ch2 into the loop, *3dc, ch1* 3 times into the loop, 3dc, ch2. Join with a slip stitch to the starting ch2. This will probably give a larger hole in the center, but not too large.
Details of the yarns/colors used in my granny rectangle:
- Lion Brand Yarn 860-150 Vanna’s Choice Yarn, Pale Grey https://amzn.to/2OloR1U
- Loops & Threads Impeccable Yarn, Grass https://amzn.to/30rDKXj
- Loops & Threads Impeccable Yarn,Fern https://amzn.to/31HLC4e
- Clover 3672 Amour Crochet Hook Set, 10 sizes https://amzn.to/30xFF8K
Check out my crochet stitch library for more inspiration!